dometic refrigerator troubleshooting manual

Dometic Refrigerator Troubleshooting Manual: A Comprehensive Guide
Navigating Dometic refrigerator issues requires understanding error codes‚ power settings‚ and component checks; this guide offers solutions for common problems and preventative maintenance.
Dometic refrigerators are a popular choice for recreational vehicles‚ boats‚ and off-grid living‚ known for their reliability and efficiency. However‚ like any appliance‚ they can experience issues requiring troubleshooting. These refrigerators often utilize absorption cooling technology‚ relying on gas (LP) or electricity as power sources. Understanding the core components – the compressor‚ control boards‚ NTC sensors‚ and gas system – is crucial for effective diagnosis.
Common problems range from simple power supply issues and communication errors (like the E0 code) to more complex cooling system malfunctions (E3). Dometic incorporates adjustable battery protection settings (High‚ Medium‚ Low) to prevent draining a vehicle’s battery‚ a feature often implicated in operational hiccups. This manual aims to provide a comprehensive overview of potential problems and solutions‚ empowering owners to address issues independently or prepare for professional service.
Understanding Common Dometic Refrigerator Issues
Frequent Dometic refrigerator problems often stem from power fluctuations or gas supply interruptions. A common symptom is the refrigerator failing to start‚ sometimes accompanied by a “clunk” noise‚ indicating a potential issue with the compressor attempting to engage but being blocked by low voltage. Error codes‚ such as E0 (loss of communication) and E1 (flame failure)‚ provide valuable diagnostic clues.
Loose or corroded connections on control boards are a frequent culprit behind communication errors. The W01 error‚ signifying a defective NTC fridge compartment sensor‚ also appears regularly. Power outages‚ even brief ones‚ can trigger a switch to LP gas‚ potentially leading to ignition problems upon power restoration. Addressing these issues often involves checking connections‚ verifying gas supply‚ and understanding the adjustable battery protection settings.
Error Codes and Their Meanings
Dometic error codes pinpoint issues‚ from E0 (communication loss) and E1 (ignition failure) to E3 (cooling malfunction) and W01 (sensor defect).
E0 Error Code: Loss of Communication
The E0 error code on a Dometic refrigerator signifies a loss of communication between the control board and other refrigerator components‚ often the compressor. This doesn’t necessarily mean a catastrophic failure‚ but rather a disruption in the signal exchange. A common cause is corroded or loose connections – a simple fix often resolves the issue.
Crucially‚ disconnect all power before inspecting and reseating connections on the control board module located at the back of the refrigerator. Also‚ check the lower control board (accessible externally) and the internal control board behind the “eyebrow” panel. The refrigerator may still function somewhat with an E0 error‚ but performance will be compromised. Prioritize checking connections as a first step‚ as this is frequently the root cause of this communication breakdown.
E1 Error Code: Flame Failure/Ignition Issue
The E1 error code indicates a problem with the ignition system when the refrigerator is operating on LP gas. Specifically‚ it signals a flame failure – the igniter is attempting to light the gas‚ but the flame isn’t consistently detected. This can occur after a power outage‚ as seen when power restoration caused an E1 code after a previous LP gas operation.
Potential causes include a faulty igniter‚ a dirty or malfunctioning flame sensor‚ or issues with the gas valve. Verify the LP gas supply is adequate. Inspect the igniter for damage and ensure the flame sensor is clean and properly positioned. If the problem persists‚ a professional may need to diagnose and repair the gas valve or ignition system to restore proper operation.
E3 Error Code: Cooling System Malfunction
The E3 error code signifies a broader issue within the Dometic refrigerator’s cooling system. Reports indicate encountering this code when the refrigerator stops cooling altogether. This malfunction could stem from several sources‚ requiring a systematic approach to diagnosis. Potential culprits include a failing compressor‚ refrigerant leaks (requiring professional attention)‚ or a malfunctioning control board impacting cooling operation.
Initial troubleshooting involves checking for obstructions in the vents and coils. However‚ an E3 code often points to more complex problems. A reset attempt might temporarily resolve the issue‚ but a persistent E3 code necessitates professional service to accurately identify and repair the underlying cooling system defect‚ ensuring optimal performance.
W01 Error Code: NTC Fridge Compartment Defective
The W01 error code specifically indicates a problem with the NTC (Negative Temperature Coefficient) sensor located within the refrigerator compartment. This sensor is crucial for accurately measuring the internal temperature and relaying that information to the control board. When the control board detects a faulty NTC sensor‚ it displays the W01 error‚ triggering a warning symbol and flashing temperature LEDs.
Troubleshooting involves first checking the connection of the NTC sensor; a loose or corroded connection is a common cause. If the connection is secure‚ the sensor itself likely needs replacement. Addressing this promptly is vital‚ as an inaccurate temperature reading can lead to inefficient cooling or even damage to the refrigerator’s components.
Power Supply and Battery Protection
Dometic refrigerators feature adjustable battery protection (High‚ Medium‚ Low) to prevent draining the van battery during compressor operation‚ ensuring reliable starting.
Adjustable Battery Protection Settings (High‚ Medium‚ Low)
Dometic refrigerators incorporate adjustable battery protection settings – High‚ Medium‚ and Low – designed to safeguard your vehicle’s starting battery. These settings dictate the voltage level at which the refrigerator will automatically shut down the compressor to prevent excessive battery drain. High offers the most conservative protection‚ shutting down at a higher voltage‚ ideal for older or smaller batteries. Medium provides a balance between cooling performance and battery preservation‚ suitable for most installations. Low allows the refrigerator to operate at lower voltages‚ maximizing cooling but potentially risking battery depletion.
Understanding your battery’s specifications and typical usage patterns is crucial when selecting the appropriate setting. If experiencing frequent shutdowns‚ consider adjusting to a higher protection level. Regularly monitoring battery voltage is also recommended to ensure optimal performance and prevent unexpected interruptions.
Impact of Low Battery Voltage on Refrigerator Operation
Low battery voltage significantly impacts Dometic refrigerator performance‚ often manifesting as intermittent operation or complete shutdown. The refrigerator’s control system is designed to prioritize vehicle starting capability‚ thus it will disable the compressor before the battery is fully drained. This can lead to inconsistent cooling and potential food spoilage. An E0 error code‚ indicating loss of communication‚ can frequently arise from insufficient power reaching the control board.
Repeated low voltage events can also stress the compressor and other electrical components‚ potentially shortening their lifespan. Regularly checking battery charge levels‚ especially during extended periods of boondocking or limited driving‚ is vital. Utilizing the adjustable battery protection settings appropriately helps mitigate these issues‚ ensuring reliable refrigerator operation and preventing battery damage.
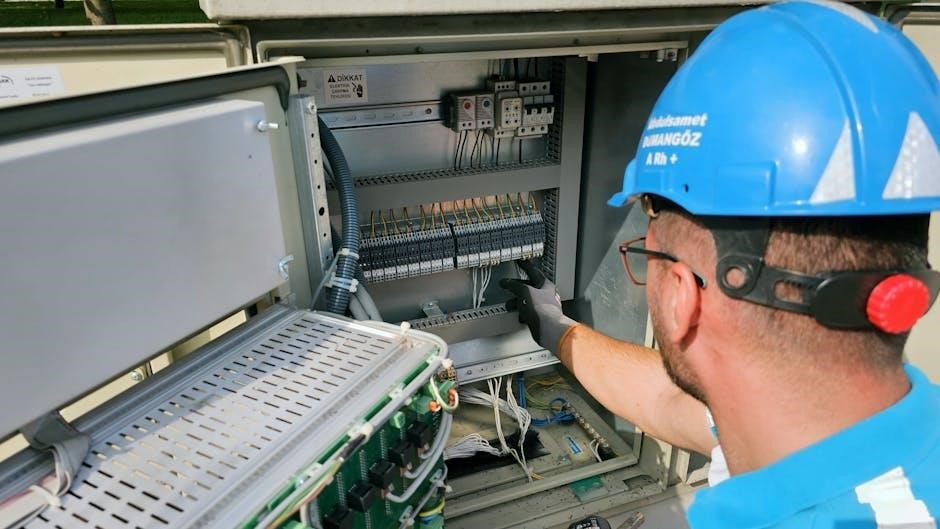
Checking and Maintaining Power Connections
Consistent power delivery is crucial for optimal Dometic refrigerator function. Begin by visually inspecting all wiring connections – at the control board module‚ lower control board‚ and within the “eyebrow” panel – for signs of corrosion or looseness. Disconnect all power before physically reseating these connections to ensure a secure fit. Pay close attention to ground connections‚ as these are often a source of issues.
Regularly cleaning connection points with a contact cleaner can prevent future corrosion. Verify the integrity of the wiring harness itself‚ looking for any damaged or frayed wires. A multimeter can be used to confirm voltage levels at various points in the system. Maintaining clean and tight power connections is a proactive step towards preventing frustrating E0 error codes and ensuring reliable cooling.

Component Troubleshooting
Addressing refrigerator malfunctions involves inspecting the control boards‚ compressor‚ and related components for loose connections or failures‚ often requiring power disconnection.
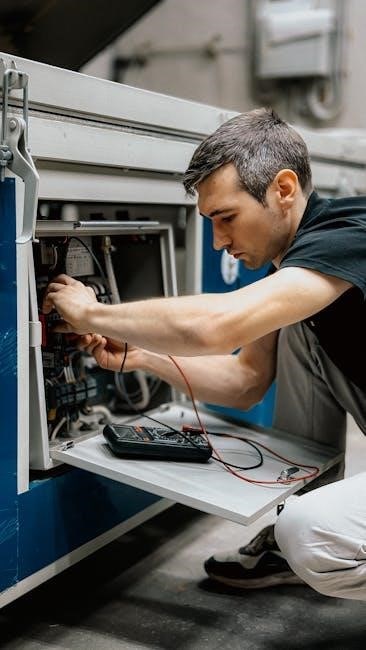
Control Board Module: Reseating Connections
A frequent cause of the E0 error code – indicating a loss of communication – stems from corroded or loose connections on the control board module. Before proceeding‚ completely disconnect all power to the refrigerator. Locate the control board module at the back of the unit. Carefully unplug and then firmly reinsert each connection. This simple step can often resolve intermittent communication issues.
Inspect the connectors for any visible signs of corrosion. If corrosion is present‚ gently clean the contacts with a suitable electronic contact cleaner before reconnecting. Ensure each connector clicks securely into place. Reseating these connections establishes a reliable pathway for signals‚ potentially restoring proper refrigerator function and eliminating the E0 error. This is a crucial first step in troubleshooting.
Lower Control Board: Connection Issues
If reseating connections on the main control board doesn’t resolve the E0 error‚ attention should turn to the lower control board‚ typically located externally on the refrigerator unit. Disconnect all power sources before accessing this board. Carefully examine and reseat all connections present on the lower control board‚ ensuring each is firmly and securely plugged in.
Similar to the main control board‚ inspect these connections for any evidence of corrosion. Clean any corroded contacts with an appropriate electronic contact cleaner. A loose or corroded connection here can disrupt communication between the various refrigerator components‚ triggering the E0 error. If the issue persists after reseating‚ proceed to check the internal eyebrow panel connection as a next troubleshooting step.
Internal Control Board (Eyebrow Panel): Connection Reseating
Following the lower control board check‚ access the internal control board‚ often referred to as the “eyebrow panel‚” located inside the refrigerator compartment. Again‚ ensure all power is disconnected before proceeding. Gently remove the panel to expose the connection. Carefully disconnect and then firmly reseat the connection‚ verifying it clicks or locks into place securely.
Inspect the connector pins for any signs of damage or corrosion. Clean if necessary with electronic contact cleaner. Even if the refrigerator continues to function somewhat with the E0 error present‚ reseating this connection is a crucial step in eliminating potential communication issues. This process‚ combined with checking the lower board‚ addresses common causes of the E0 error code.
Compressor Issues: Potential Causes and Solutions
If troubleshooting points to the compressor‚ several factors could be at play. A failing compressor may struggle to start‚ resulting in cooling issues. Low refrigerant levels‚ though requiring professional attention‚ can strain the compressor. Electrical problems‚ such as a faulty start capacitor or relay‚ can also prevent proper operation.
Diagnosing compressor issues often requires specialized tools and knowledge. While checking power supply to the compressor is possible‚ internal compressor diagnostics are best left to qualified technicians. Attempting repairs yourself could void warranties or cause further damage. If the compressor isn’t running‚ or is cycling frequently‚ professional service is highly recommended.
Gas (LP) System Troubleshooting
Addressing LP gas system faults involves verifying the gas supply‚ inspecting the igniter and flame sensor‚ and checking for malfunctions within the gas valve itself.
LP Gas Supply Verification
Ensuring a sufficient LP gas supply is the first step in troubleshooting gas-related issues. Begin by verifying the propane tank isn’t empty – a simple weight check or gauge reading will confirm this. Next‚ carefully inspect the gas line for any visible damage‚ kinks‚ or leaks. A soapy water solution applied to connections can reveal bubbles indicating a leak; never use a flame!
Confirm the gas valve on the refrigerator is fully open. If other LP appliances in the RV are functioning correctly‚ it suggests the main gas supply is adequate. However‚ a dedicated pressure test of the refrigerator’s gas inlet is recommended for definitive confirmation. Low gas pressure can mimic other failure modes‚ so a strong supply is crucial for proper ignition and operation.
Igniter/Flame Sensor Problems
A faulty igniter or flame sensor frequently causes Dometic refrigerator issues when operating on LP gas. The igniter‚ responsible for initiating combustion‚ may become coated with debris or fail entirely. A visual inspection can reveal physical damage. The flame sensor‚ crucial for detecting a stable flame‚ can also become dirty or malfunction‚ leading to intermittent ignition failures and the E1 error code.
Cleaning the flame sensor with fine steel wool can often restore functionality. If the igniter doesn’t glow or the flame is weak‚ replacement is usually necessary. Ensure proper alignment of both components. A weak or absent spark‚ coupled with a lack of flame detection‚ will prevent the gas valve from staying open‚ resulting in a shutdown and error message.
Gas Valve Malfunctions
Dometic refrigerator gas valve issues can stem from several causes‚ hindering proper LP gas flow to the burner. A malfunctioning valve might fail to open fully‚ restricting gas supply and preventing ignition‚ or it could leak‚ posing a safety hazard. Often‚ debris within the valve itself obstructs smooth operation. Electrical issues affecting the valve’s solenoid can also be a culprit.
Testing the valve requires specialized tools and knowledge; it’s generally best left to qualified technicians. Before diagnosing the valve‚ verify adequate LP gas supply and a functioning igniter. If the valve receives power but doesn’t open‚ replacement is typically the solution. Always prioritize safety when dealing with gas appliances and ensure proper leak testing after any repair.
Cooling System Diagnostics
Diagnosing cooling issues involves NTC sensor testing‚ checking refrigerant levels (professional service needed)‚ and verifying proper evaporator fan operation for optimal performance.
NTC Sensor Testing and Replacement
NTC (Negative Temperature Coefficient) sensors are crucial for accurate temperature readings within the Dometic refrigerator. A defective NTC sensor‚ specifically in the fridge compartment (indicated by error code W01)‚ disrupts cooling. Testing involves checking the sensor’s resistance with a multimeter; values outside the specified range necessitate replacement.
Before replacing‚ carefully disconnect power. Locate the sensor – typically within the refrigerator compartment – and gently unplug it. Install the new NTC sensor‚ ensuring a secure connection. Verify proper operation by monitoring temperatures and observing if the W01 error code clears. Always consult the Dometic service manual for specific resistance values and sensor locations for your model. Proper sensor function is vital for efficient cooling and preventing system malfunctions.
Refrigerant Levels and Leaks (Professional Service Required)
Diagnosing refrigerant levels and leaks within a Dometic refrigerator demands specialized tools and expertise; it is not a DIY task. Low refrigerant significantly impacts cooling performance‚ potentially leading to compressor failure. Identifying leaks requires a trained technician utilizing leak detection equipment.
Attempting to handle refrigerant yourself is dangerous and illegal. A qualified technician will safely recover any remaining refrigerant‚ pinpoint the leak’s source‚ repair it‚ and then recharge the system to the manufacturer’s specified levels. Improper handling can cause environmental damage and compromise the refrigerator’s functionality. Always prioritize professional service for refrigerant-related issues to ensure safety and optimal performance.
Evaporator Fan Operation
The evaporator fan is crucial for circulating cold air throughout the Dometic refrigerator. A malfunctioning fan results in uneven temperatures or a complete lack of cooling‚ even if the compressor is running. Check if the fan is obstructed by ice buildup or debris – this is a common cause. Listen for the fan’s operation; silence indicates a potential motor failure.
Visually inspect the fan blades for damage. If the fan operates intermittently or makes unusual noises‚ the motor may be failing and require replacement. Caution: Disconnect power before inspecting or attempting any repairs. A properly functioning evaporator fan ensures efficient cooling and prevents temperature fluctuations within the refrigerator compartment.
Resetting Your Dometic Refrigerator
Resetting procedures‚ including manual and power cycle options‚ can resolve minor errors like E3‚ restoring functionality when the refrigerator fails to cool properly.
Manual Reset Procedures
When encountering error codes‚ a manual reset can often restore Dometic refrigerator operation. Begin by completely disconnecting all power sources – both AC and DC‚ and crucially‚ the LP gas supply. Allow the system to remain powered down for a minimum of five minutes to fully discharge any residual energy.
After the waiting period‚ reconnect the power sources one at a time‚ starting with DC‚ then AC‚ and finally the LP gas. Observe the control panel for any immediate error displays. If the error persists‚ attempt a power cycle reset (described separately). Remember that a manual reset doesn’t address underlying issues; it’s a temporary fix.
Consult the service manual image for guidance‚ as the refrigerator may function somewhat even with an active E0 error‚ indicating a communication issue. Prioritize checking connections before relying on repeated resets.
Power Cycle Reset
A power cycle reset is a more thorough attempt to clear Dometic refrigerator errors than a simple manual reset. Begin by disconnecting all power sources: 12V DC‚ 120V AC‚ and the LP gas supply. This ensures a complete system shutdown‚ allowing the control board to fully reset its memory.
Crucially‚ wait a full five minutes before reconnecting power. This allows capacitors to discharge‚ effectively clearing any temporary glitches. Reconnect power in the reverse order of disconnection – LP gas first‚ then AC‚ and finally DC. Monitor the refrigerator’s display for error codes.
If the error persists after a power cycle‚ it suggests a more significant underlying issue requiring further investigation‚ such as a faulty sensor or a communication problem. Repeated power cycles are not a long-term solution.
Preventative Maintenance
Regular cleaning of vents and coils‚ corrosion checks on connections‚ and ensuring proper ventilation are vital for optimal Dometic refrigerator performance and longevity.
Regular Cleaning of Vents and Coils
Maintaining clean vents and coils is crucial for efficient cooling. Dust and debris accumulation restricts airflow‚ forcing the compressor to work harder and potentially leading to overheating or failure. Inspect the condenser coils‚ typically located on the back of the refrigerator‚ at least twice a year. Use a vacuum cleaner with a brush attachment to gently remove dust.
Similarly‚ check the evaporator coils inside the refrigerator compartment‚ often behind a panel. Ensure the vents‚ both internal and external‚ are unobstructed. Blocked vents hinder proper temperature distribution. A simple cleaning routine can significantly improve performance and extend the lifespan of your Dometic refrigerator‚ preventing potential issues and costly repairs. Remember to disconnect power before cleaning!
Checking for Corrosion on Connections
Corrosion on electrical connections is a frequent cause of Dometic refrigerator malfunctions‚ often manifesting as an E0 error code – a loss of communication. Regularly inspect all wiring connections‚ particularly those on the control board module‚ lower control board‚ and internal eyebrow panel. Look for green or white powdery residue indicating corrosion.
Disconnect the power supply before inspecting or cleaning connections. Use a small wire brush or electrical contact cleaner to carefully remove any corrosion. Ensure connections are secure and tight after cleaning. Addressing corrosion proactively prevents intermittent operation‚ improves reliability‚ and avoids more significant component failures. Pay close attention to connections exposed to moisture or fluctuating temperatures.
Proper Ventilation
Adequate ventilation is crucial for efficient Dometic refrigerator operation‚ especially for cooling systems relying on convection. Restricted airflow hinders heat dissipation‚ forcing the compressor to work harder and potentially leading to overheating or reduced cooling performance. Ensure the refrigerator’s vents – both internal and external – are unobstructed by items like clothing‚ bedding‚ or other stored materials.
Confirm sufficient space around the refrigerator’s exterior for air circulation. Avoid enclosing the unit in tight compartments. Regularly clean vent openings to remove dust and debris. Proper ventilation not only optimizes cooling but also extends the lifespan of the compressor and other vital components‚ preventing premature failure and ensuring consistent temperature regulation;
Advanced Troubleshooting (Professional Help Recommended)
Complex issues like compressor diagnostics or control board failures necessitate specialized tools and expertise; professional service is strongly advised for these repairs.
Compressor Diagnostics
Diagnosing compressor problems requires a systematic approach‚ best left to qualified technicians. Initial checks involve verifying power supply to the compressor and listening for unusual noises during operation. A lack of compressor start-up‚ accompanied by the E3 error code‚ often indicates a compressor failure or a related electrical issue.
However‚ before assuming a compressor fault‚ confirm the adjustable battery protection settings aren’t prematurely shutting down the compressor due to perceived low voltage. Professionals utilize specialized equipment to assess compressor windings for shorts or opens‚ and to measure refrigerant pressures. Incorrect refrigerant levels‚ or the presence of leaks‚ can severely impact compressor performance and require professional attention. Attempting compressor repairs without proper training and tools can lead to further damage and safety hazards.
Control Board Failure
Control board issues frequently manifest as communication errors (E0 code) or complete refrigerator shutdown. A primary troubleshooting step involves disconnecting and reseating all connections on the control board module‚ located at the rear of the unit‚ ensuring a secure fit. Also‚ inspect the lower control board connections externally and the internal “eyebrow panel” connection for looseness or corrosion.
However‚ diagnosing a complete control board failure often necessitates professional expertise. Technicians employ diagnostic tools to test board components and identify faulty circuits. Replacement control boards are specific to the refrigerator model and require correct programming. Attempting to repair a control board without specialized knowledge can cause further damage. A failing control board can exhibit intermittent issues‚ making diagnosis challenging.


Leave a Reply
You must be logged in to post a comment.